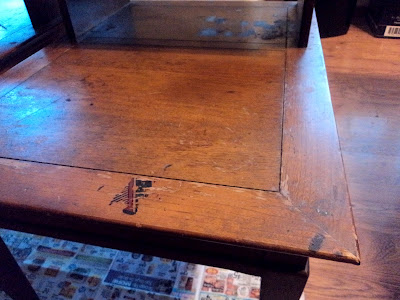
I think they were originally from Pier 1 but I'm not sure. Regardless, they were in pretty bad shape. But I had always liked the simple clean lines and just thought they had really good bones. I just never got around to doing anything with them. Maybe I was a little too scared of how damaged the wood was (and still is)...
See what I mean? Pretty bad. Anyway, I had never stained anything before and it was quite an interesting process. Here was my list of supplies:
- Minwax Wood Finish in "Red Mahogany"
- Minwax Fast Drying Polyurethane
- 60 grit & 150 grit sandpaper
- A cheap 2-inch paint brush
- A bunch of rags
Then I got down to business. The first thing I did was sand the entire first table with 60 grit paper. Then went over it with the 150 grit. If there was ONE THING I learned from the entire staining process, it would be to sand more. Sand, sand, and sand some more. Be extremely thorough! After you're done sanding, be sure to wipe off the table with a wet rag. After it's dry, you can apply a THIN and even coat of the stain.
I let the stain sit on the table for about 20 minutes. During these twenty minutes is when I started to realize this wasn't going to be the easiest thing in the world to do. I noticed that the table wasn't completely soaking up all the stain. This brings me back to saying, SAND, SAND, SAND! If I had sanded the table more, the table would have soaked up a lot more.
After twenty minutes of soaking, I took one of my rags and starting wiping up the excess stain that had not soaked through the wood. Be sure to wipe the rag in the direction of the wood grain. Unfortunately for me, the process was not going so great. I ended up needing to do three coats of wood stain to get the desired effect I was looking for. And each coat needed at least six hours drying time so this turned into an ongoing process. I ended up moving the tables to one of my unfinished back rooms to dry.
The above picture was what the end tables looked like after applying the polyurethane. When you are completely satisfied with the wood stain and it has been allowed ample drying time, you can apply the polyurethane. This particular Minwax Wood Finish requires the polyurethane to seal everything and give it a nice glossy finish that will make it easy for wiping clean. What I really like about the above picture were all the dark corners - the wood stain actually made the damaged wood look really antique and actually kinda cool!
So there they are! I think they look ten times better. Am I 100% happy with them? No. I am even less happy that we rearranged the furniture in our living room and now my newly stained end tables don't really fit. Isn't that just my luck? Either way, they'll work for now and I'm sure I'll end up putting them somewhere else in the house. Here's one more unedited picture for you so you can see the true red mahogany tones in the tables:
All done! You can certainly see the damaged wood still, but at least they have a much prettier wood stain. I have definitely learned from this experience, and although during the process I swore I would never do this again, I think I will. Most likely on wood that isn't so damaged, and preferably when I have an electric sander!


No comments:
Post a Comment